Apptainer on OzSTAR
Apptainer (formerly Singularity) enables users to have full control of their environment. Apptainer containers can be used to package entire scientific workflows, software and libraries, and even data. This means that you don't have to ask your cluster admin to install anything for you - you can put it in a Apptainer container and run.
You can use Apptainer by loading the module
module load apptainer
Usage
For comprehensive instructions on using Apptainer, please visit the official documentation: https://apptainer.org/docs/user/main/
Building a containerised conda environment
Here we will show you how to containerise a conda environment. We will use a Docker image as our starting point (https://hub.docker.com/r/mambaorg/micromamba).
Apptainer images can be built from plain text, 'definition' files, analogous to a Dockerfile.
Consider the following apptainer definition file, bilby.def:
BootStrap: docker
From: mambaorg/micromamba:1.4.6-jammy

%post
    micromamba install -qy -n base -c conda-forge python=3.10 bilby gwpy python-lalsimulation
Note
We have chosen to bootstrap specifically from the micromamba:1.4.6-jammy image, since its glibc version most closely matches OzSTAR's system glibc (see Fakeroot feature below).
Then, to build the image, do
apptainer build bilby.sif bilby.def
This will:
download the
micromamba:1.4.6-jammyimage from DockerHubconvert it to
sifformatinstall Python v3.10,
bilby, and a few other python packages in to the base conda/mamba environment within the imagesave the image as
bilby.sif
Now you can execute commands within your containerised conda environment. For example, to run a python script:
./bilby.sif python my-script.py
If your python script is executable and has the shebang #!/usr/bin/env python, then the command can be as simple as
./bilby.sif my-script.py
Or, if you need to add some bind mounts, you can do e.g.
apptainer run -B /fred/oz999,/some/other/path bilby.sif python my-script.py
In all cases, whatever comes after the sif file is the command to be executed inside the container.
Note
Your script needs to exist within the container in order to be executed. In this instance, since my-script.py is in the current directory, it is available to the container, but only if $PWD is successfully mounted. (See Binding the filesystem to a container below).
For a similar example, but instead using the official Python Docker image and pip, see Python Apptainer Example.
Binding the filesystem to a container
When you run a container, the host file system becomes inaccessible. However, you may want to read and write files on the host system from within the container. To enable this functionality, you can 'bind' specific directories in to the container.
To bind /fred from OzSTAR to /fred in your container:
apptainer run -B /fred mycontainer.sif
To bind your project directory to a specific location in your container
(In this case /fred/oz123 from OzSTAR to /oz123 inside the container):
apptainer run -B /fred/oz123:/oz123 mycontainer.sif
To bind multiple paths:
apptainer run -B /fred/oz123,/some/other/path mycontainer.sif
By default, Apptainer also implicitly binds several other directories:
$HOME
$PWD
/sys
/proc
/dev
/tmp
/var/tmp
/etc/resolv.conf
/etc/passwd
/etc/localtime
/etc/hosts
(See https://apptainer.org/docs/user/main/bind_paths_and_mounts.html)
Note
Apptainer binds $PWD by default, which is the current working directory when you run the command. If the directory does not exist inside the container, it will be automatically created. As a result, the behaviour of the apptainer command can be different depending on where you run it from.
It is also possible to bind in other filesystem images.
For example, if you have all your data in a read-only squashfs data.sqfs, you can do
apptainer run -B data.sqfs:/data:image-src=/ app.sif
which will mount the / of your squashfs to /data in the container.
If the mount point /data doesn't exist, it will be created.
Using a GPU with a container
If you have requested one or more Nvidia GPU's in your batch job, you can access the GPU's in your container using the --nv switch. This will automatically bind the GPU's in to your container. You may still need to have your own cuda installation in your container.
apptainer run --nv mycontainer.sif
Increasing the speed of your container on OzSTAR
Depending on your workload, it is often better to request --tmp storage and copy your image to there before you use your container. In many cases this will provide better performance. It is important that your requested --tmp size is bigger than your apptainer image, or --tmp will run out of space and your job will crash.
For example, in your batch script:
#!/bin/bash
#SBATCH --tmp=10G

cp /path/to/my/container.sif $JOBFS/container.sif

apptainer run $JOBFS/container.sif
Running 32-bit applications inside a container
OzSTAR does not provide 32-bit libraries, so if you are stuck needing to run/build a 32-bit application, using Apptainer is the best way forward.
Our suggested strategy is to start with an existing image that has a GLIBC version similar to OzSTAR, within which you then install the necessary 32-bit libraries and run/compile your 32-bit application.
For example, consider the following definition file 32bit.def
BootStrap: docker
From: almalinux:9

%post
yum update -y
yum install -y csh gcc make flex libXmu-devel libX11-devel glibc.i686 zlib-devel.i686 libcurl-devel.i686 expat-devel.i686 readline-devel.i686
yum clean all
Building this in to an image with apptainer build 32bit.sif 32bit.def then allows you to run/compile 32-bit applications, e.g.
apptainer run -B /fred/oz123 32bit.sif /path/to/my/32bit/binary
Using MPI with a container
Please read through the Apptainer documentation on using Apptainer with MPI applications before attempting to run your application.
We recommend following the hybrid model, which involves running the MPI launcher outside the container and having a comptatible MPI library inside the container -- they should be of the same implementation and the same major version.
On OzSTAR we only support and provide OpenMPI, so you need to have OpenMPI installed in your container. It is typically sufficient to install it from the system package manager, but in order to make use of the high speed Infiniband network you also need to ensure you have a few other packages installed.
For RHEL based distros (e.g. Rocky Linux, AlmaLinux), make sure to install
dnf install -y openmpi openmpi-devel ucx ucx-cma ucx-ib ucx-rdmacm
dnf group install -y "InfiniBand Support"
For Debian based distros (e.g. Debian, Ubuntu), make sure to install
apt-get install openmpi-bin libopenmpi-dev infiniband-diags ucx-utils
For a conda-forge environment inside of a container, follow the relevant instructions above and then install the dummy conda-forge OpenMPI package. This will allow your conda environment to use the container's system OpenMPI libraries, which will communicate correctly with the host OpenMPI library on OzSTAR.
Once you have your container set up, all you have to do is load a comptatible version of OpenMPI and run your MPI application. For example, if your container has OpenMPI 4.1.4, you should load at least the same version of OpenMPI or higher, but still within the same major version (i.e. 4.1.4 <= x.y.z < 5.0.0). You can then run your MPI application like this:
module load gcc/12.3.0 openmpi/4.1.5
mpirun -n 4 apptainer run --sharens -B /fred/oz123 mycontainer.sif /path/in/container/to/application
To ensure intranode communication is as fast as possible, remember to use the --sharens flag. This ensures that all processes on the same node share the same user namespace, and thus don't run into issues when attempting to leverage intranode communication transports.
Warning
The instructions above should work in most cases, however MPI with high-speed interconnect fabrics can be tricky to tune. The exact transports used depend on the OpenMPI configuration and environment variables. OzSTAR has two different high-speed fabrics (Mellanox on Milan nodes and OPA on Skylake nodes) which require different transports for optimal performance. While we have environment variables that should pass through and ensure correct transport selection, issues can still arise depending on what's available in the container's OpenMPI installation. If you notice poor performance or errors when running MPI applications, please contact the OzSTAR support team for assistance.
MPI performance: container vs bare metal
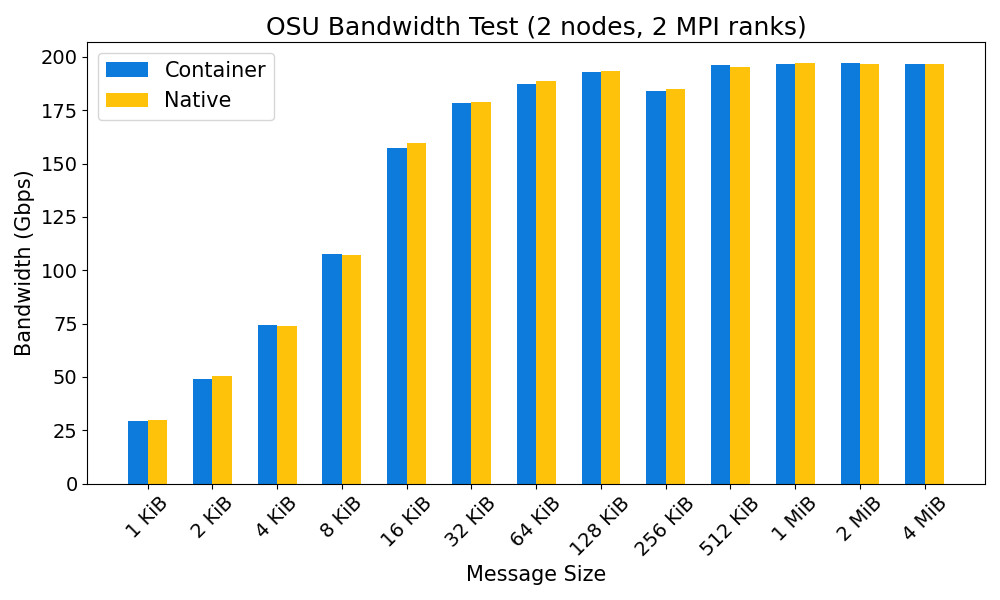
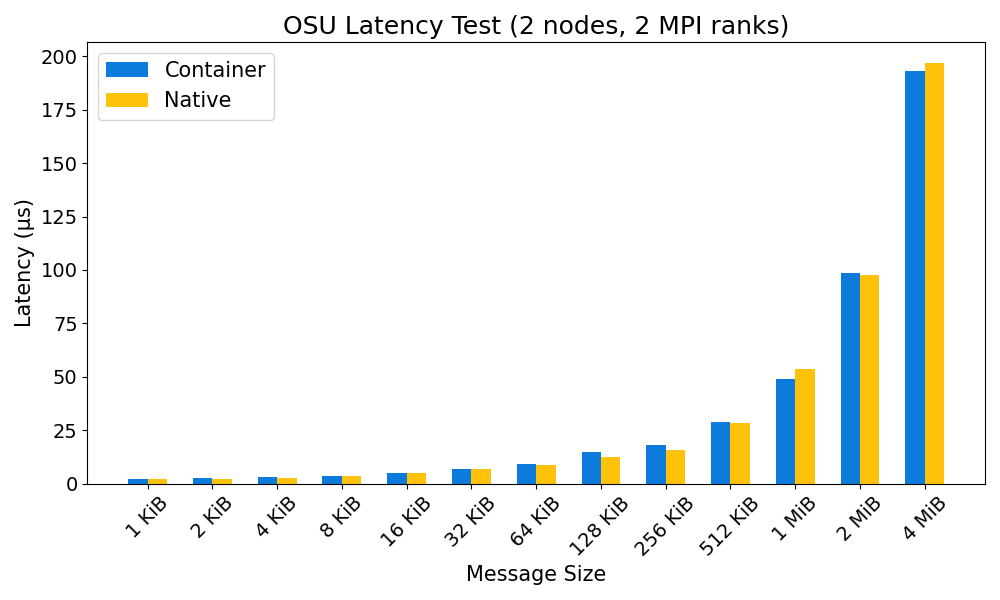
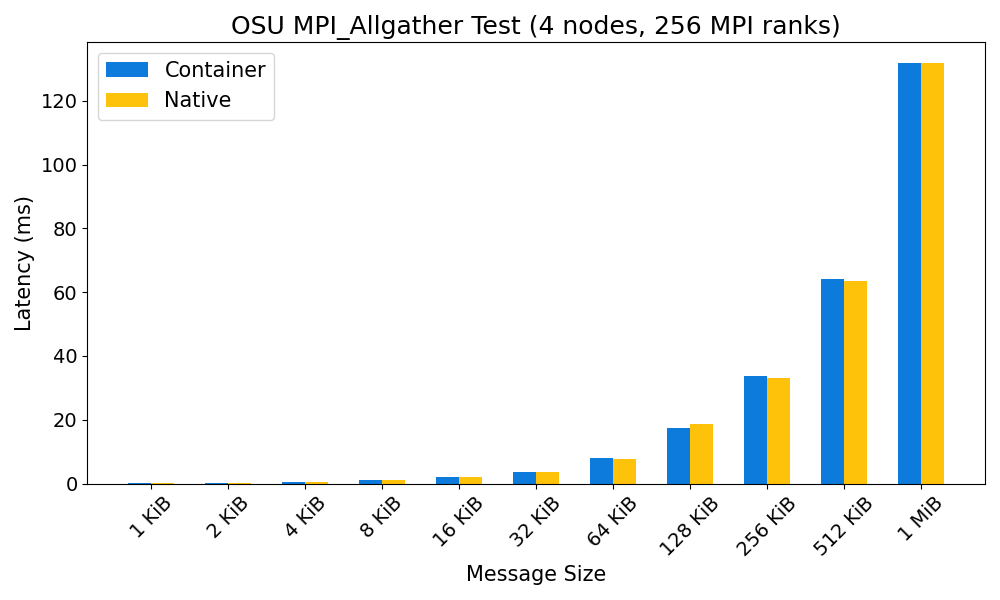
The performance overhead in running MPI applications inside a container on OzSTAR is typically negligible. See the plots below for a comparison of the performance of the OSU MPI benchmarks in a Debian 12 container with GCC 12.2.0 and OpenMPI 4.1.4, and the same OSU benchmarks run on bare metal (also with GCC 12.2.0 and OpenMPI 4.1.4).


Fakeroot feature
Apptainer on OzSTAR uses the fakeroot command in addition to a root-mapped user namespace to allow an unprivileged user to run a container with the appearance of running as root. (See option 3 at https://apptainer.org/docs/user/main/fakeroot.html).
This is useful for avoiding errors when building containers; the combination of a root-mapped user namespace with the fakeroot command allows most package installations to work. However, the fakeroot command is bound in from the host, so if the host libc library is of a very different vintage than the corresponding container the fakeroot command can fail with errors about a missing GLIBC version.
The error you might see in that situation will look something like:
/.singularity.d/libs/faked: /lib64/libc.so.6: version `GLIBC_2.33' not found (required by /.singularity.d/libs/faked)
If that happens, try the following bootstrap script for installing a GLIBC compatible fakeroot inside your container: https://github.com/dliptai/fakeroot-bootstrap.
This fakeroot binary can then be used in subsequent steps in your %post section of your definition file for package installations that were failing previously.
Note
See the Apptainer documentation on this topic
Sandbox mode
Apptainer's "sandbox" mode allows you to build and run a container that is unpacked to a directory on the host system, rather than a single SIF image.
Combined with the --writable flag, it can be useful during development and testing by allowing you to iterate and make changes to your container without having to rebuild the entire container each time.
Warning
However, sandbox mode should not be used for production runs, as it completely negates all the benefits of using Apptainer in terms of Lustre I/O. Once you are happy with your container, you should convert it into a SIF image and use that for your production runs.